Time Flow Sketch
映像の中の時間の流れを、絵を描く感覚で操作する iPhone / iPad アプリ
このアプリについて
読み込んだ動画に対して、白黒の濃淡で「時間の流れの形」を描きます。 描いた明るさがそのまま時間の位置や再生の速さになり、画面の場所ごとに違う時間が流れはじめます。
指でなぞったところだけが先に進む。別の場所は逆再生になる。 ある部分だけ時間が止まったまま、まわりだけが動いていく。 ふだん一様に流れている映像の時間を、ばらばらに解きほぐして組み立て直すことができます。
基本の使い方
1. 画面の見かた
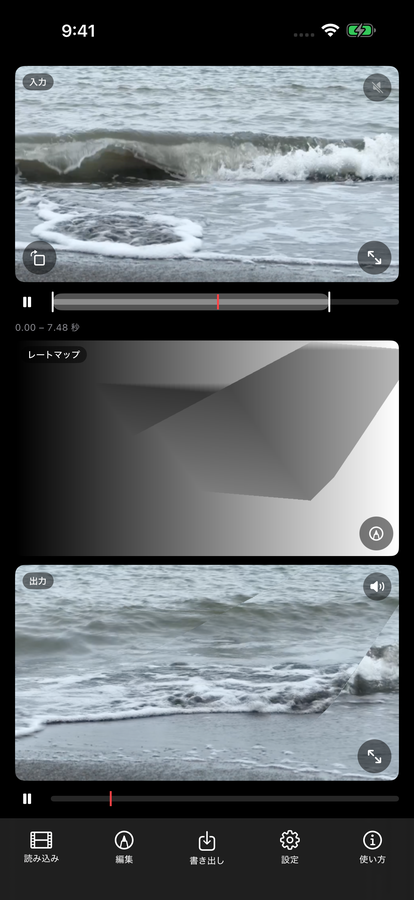
トップ画面は上から 入力映像・マップ画像・出力映像 の3段です。 同じ素材が、マップによってどう変わったかをその場で見比べられます。
入力映像の下のバーは使用範囲を兼ねています。両端の白いハンドルで素材のどこを使うかを決め、 長押ししてから引くと長さを保ったまま範囲をずらせます。ハンドルを動かしている間は、入力映像にその端の瞬間が映ります。 右上のスピーカーで音を切り替えます。入力は素材そのままの音、出力は時間操作を受けた音で、鳴るのはどちらか一方だけです。
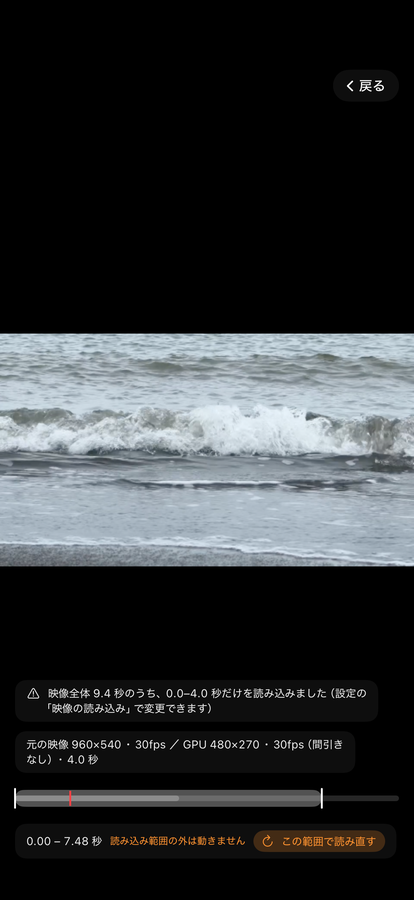
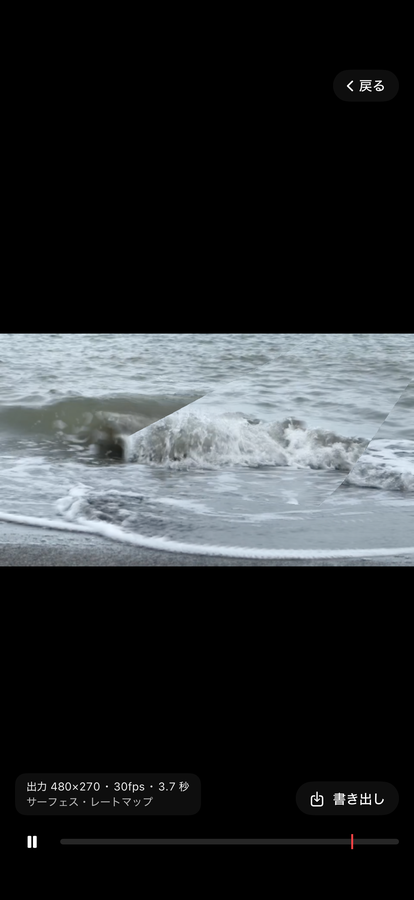
入力・出力それぞれの右下のボタンで全画面表示になります。 入力の全画面には使用範囲のバーと読み込みの情報(元の映像と GPU 上の映像の大きさ・fps)が出て、情報をタップすると読み込みの設定を開けます。 出力の全画面には再生バーと出力の情報が出て、その場で書き出せます。
最初は画面下の「読み込み」から動画を選びます。動きのある映像ほど効果がはっきり出ます。 フル HD 以下の軽い素材が扱いやすく、読み込みも速く済みます。
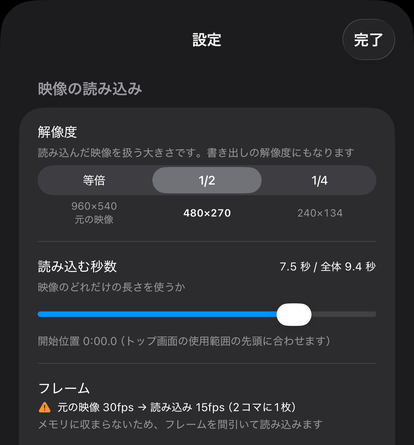
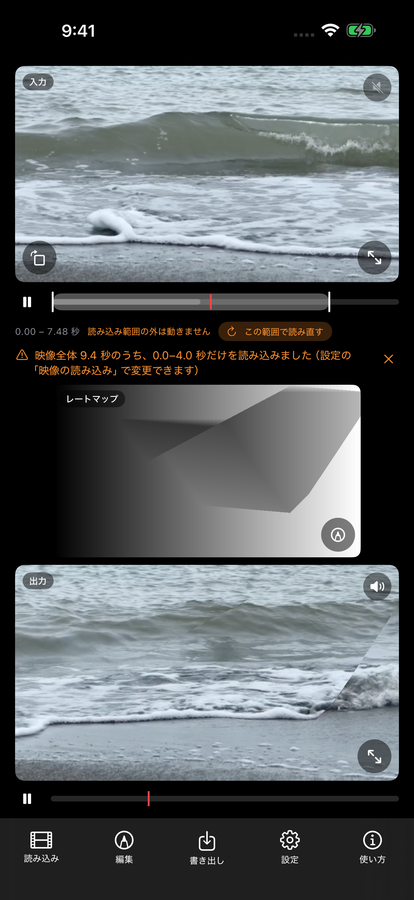
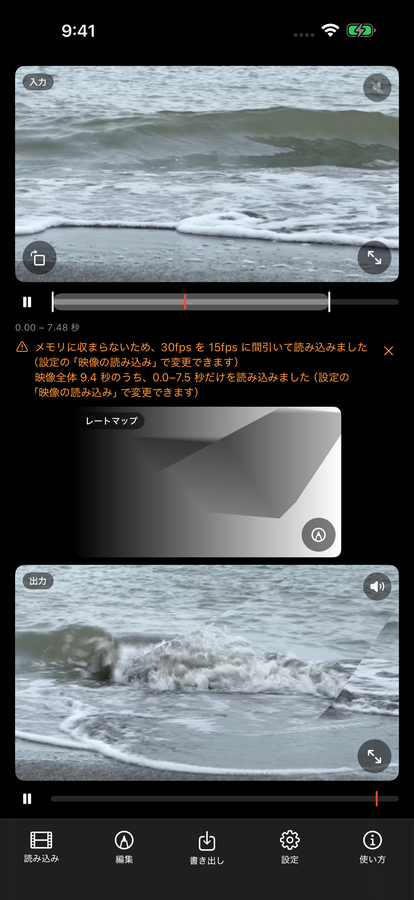
読み込む解像度と秒数は、映像とこの端末の空きメモリから自動で決まります。 入りきらないときは読み込む秒数を短くしたりフレームを間引いたりして収め、読み込み後にお知らせします。 設定の「映像の読み込み」で変えられます。 読み込んだ範囲・使用範囲と出力の長さの関係は、時間処理の仕組みで説明しています。
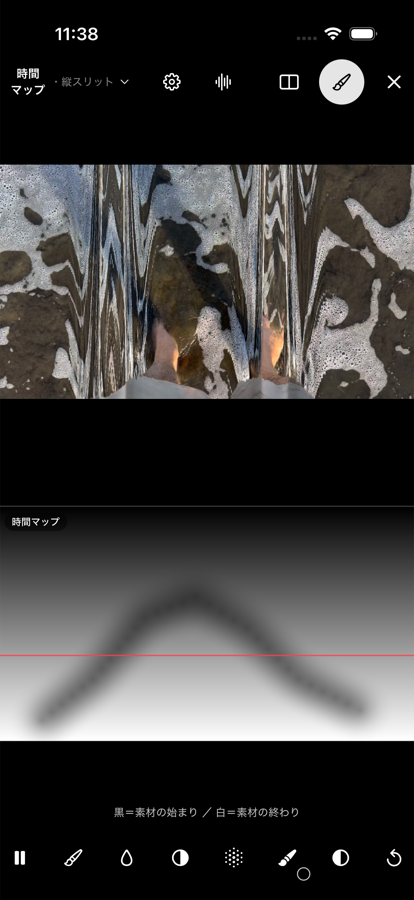
2. マップを描く
マップ画像の右下にある鉛筆アイコン、出力映像のタップ、または画面下の「編集」から編集画面に入ります。 下半分のマップの上を指や Apple Pencil でなぞると、その明るさに応じて時間の流れが変わります。
明るさの意味はマップの種類で変わります。起動時のレートマップでは黒が停止、グレーが通常の速さ、白が2倍速。 時間マップでは黒いところが素材の始まりのほう、白いところが終わりのほうを映します。 いまの設定での意味はツールの上に表示され、上の映像に結果がその場で反映されるので、描きながら確かめられます。
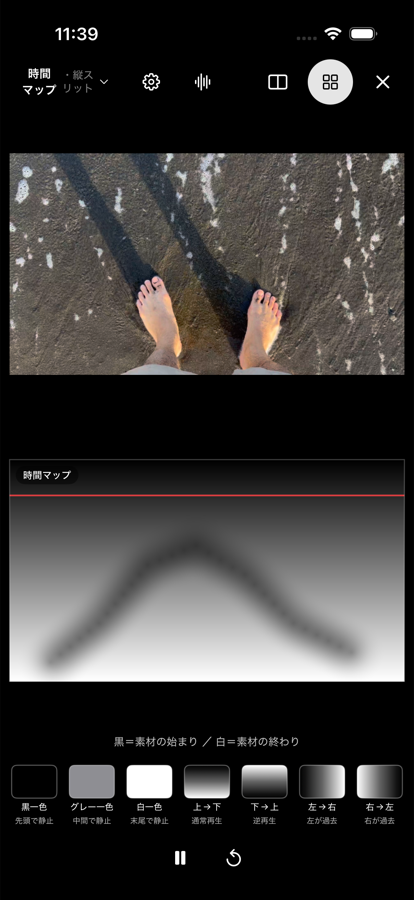
3. 生成やプリセットから始める
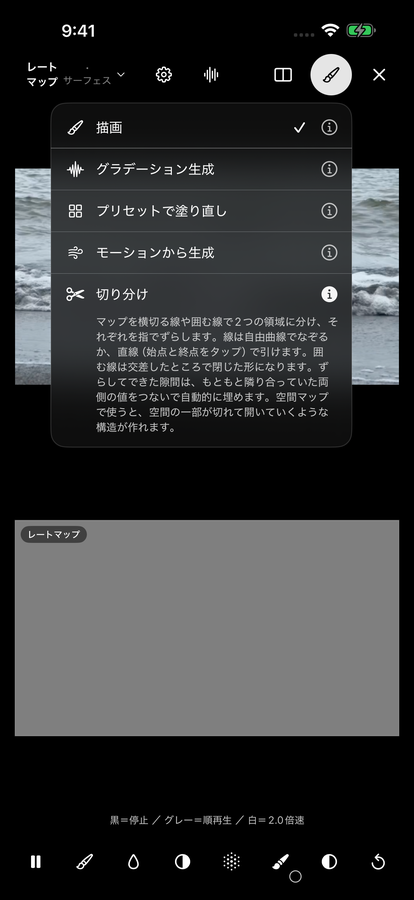
右上のアイコンから、マップの作り方を切り替えられます。各項目の右にある i で説明を開けます。 グラデーション生成は規則的な縞模様を、 モーションから生成は映像自身の動きからマップを作ります(動きの残像が変化する「ヒストリー」はサーフェスのときだけ使えます)。
プリセットで塗り直しでは、一色やグラデーションでマップ全体を塗り替えます。 各ボタンの下に、いまの設定でどう再生されるか(通常再生・逆再生・時間停止など)が表示されます。
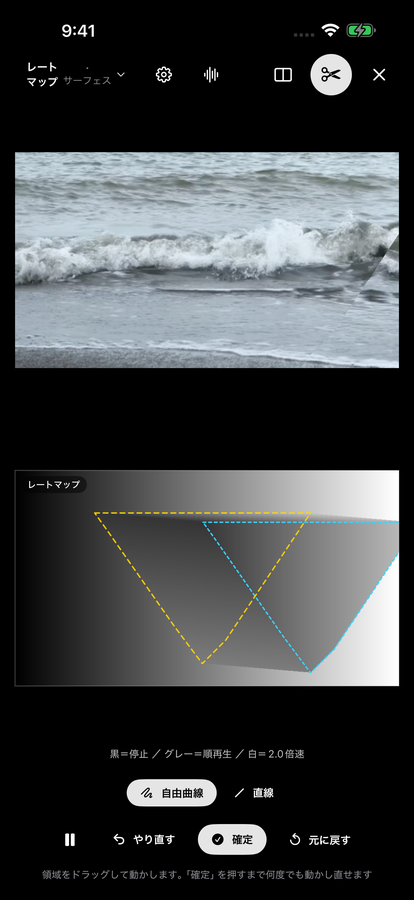
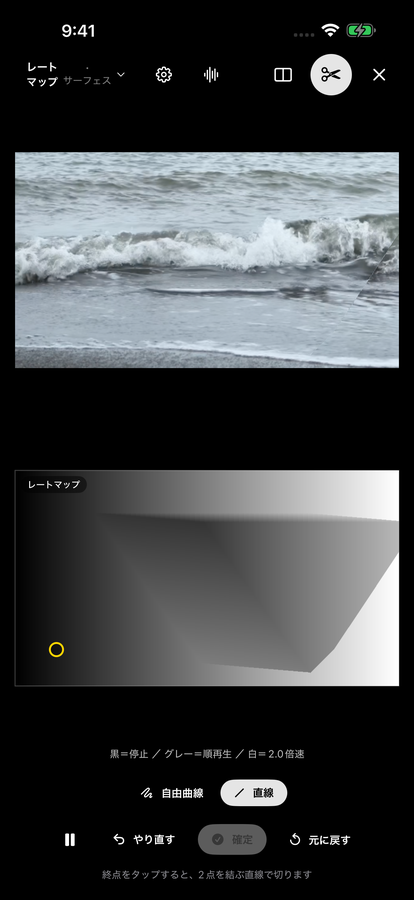
切り分けでは、マップを横切る線や囲む線で2つに分け、それぞれを指でずらします。 線は下のパレットで「自由曲線」か「直線」(始点と終点をタップ)を選べ、囲む線は交差したところで閉じた形になります。 ずらしてできた隙間は両側の値をつないで自動で埋まります。「確定」で次の線へ進み、「やり直す」で線を引き直し、 「元に戻す」で切り分けを始める前のマップに戻ります。
生成したマップの上から、そのまま描き足すこともできます。
4. 書き出す
画面下の「書き出し」から、結果を動画として写真ライブラリへ保存します。 長さは編集画面の歯車にある「再生時間」で調整でき、解像度は「映像の読み込み」で選んだ解像度になります。
適用モード
| サーフェス | 画素ごとに時刻をずらします。描いた形がそのまま時間のゆがみになる、いちばん直感的なモードです。 |
|---|---|
| 縦スリット | 画面の縦の帯ごとに違う時刻を割り当てます。マップの縦方向が出力の時間、横方向が画面の位置に対応します。 |
| 横スリット | 縦スリットの向きを入れ替えたものです。 |
| レート | 明るさを再生の速さとして扱います。逆再生から早送りまで、場所ごとに変えられます。 |
| 空間マップ | 明るさを「画面のどこから映像を取ってくるか」として扱います。時間マップやレートマップと組み合わせて使う補助的なマップで、やめるときは編集方法のメニューの「デフォルトの状態に戻す」を選びます。 |
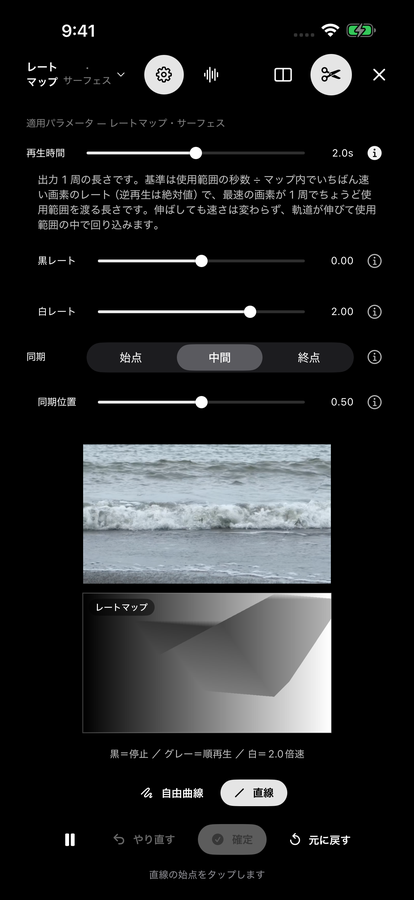
編集画面の左上にある「レートマップ・サーフェス」などの表示をタップすると、 マップの種類と適用モードをまとめて切り替えられます(起動時はレートマップ・サーフェスです)。 歯車の「適用パラメータ」とサウンドの各項目にも i ボタンがあり、いまのモードでの意味を確かめられます。
よくある質問
動画の読み込みに時間がかかります
4K や長い動画は、写真ライブラリからの取り出しに数十秒かかることがあります。 読み込み中はいつでも「中止」できます。短く切り出した素材のほうが試行錯誤しやすくなります。
アプリが途中で終了します
読み込んだ動画は端末のメモリに展開されます。 読み込む量は空きメモリから自動で決まりますが、他のアプリがメモリを使っていると足りなくなることがあります。 設定の「映像の読み込み」で解像度を 1/2 や 1/4 に下げるか、読み込む秒数を短くしてください。 他のアプリを終了してからお試しください。
「フレームを間引いて読み込みました」と表示されます
GPU が一度に扱えるフレーム数(2048枚)やメモリに収まらないときは、フレームを間引いて読み込みます。 スローモーションで撮った映像はフレーム数が多いため、特に間引かれやすくなります。 設定の「映像の読み込み」で解像度を下げるか読み込む秒数を短くすると、間引かずに読み込めます。 スリットの時間マップでは、歯車の「使用範囲だけを読み込み直す」も使えます。
「読み込み範囲の外は動きません」と表示されます
使用範囲のハンドルを、読み込んだ範囲(バーの少し明るい部分)の外まで広げたときに出ます。外側の時刻は端のフレームで止まります。 横の「この範囲で読み直す」を押すと、解像度と読み込む秒数はそのままで、使用範囲が真ん中に来る位置から読み直します。
書き出した動画が見つかりません
書き出しに成功すると写真ライブラリに保存されます。 保存の許可を求めるダイアログで「許可しない」を選んだ場合は、 iOS の「設定」→「Time Flow」→「写真」から変更できます。
音はどこから鳴っていますか
映像の右上にあるスピーカーで切り替えます。 出力を選ぶと、読み込んだ動画の音声が映像と同じ時間操作を受けて鳴ります。 入力を選ぶと、素材そのままの音が等速で鳴ります。 鳴るのはどちらか一方だけで、同時には鳴りません。音声を持たない動画では無音になります。
外部ディスプレイにつなげますか
つなげます。HDMI や AirPlay でディスプレイに接続すると、 出力映像だけがそちらに全画面で表示されます。手元の画面は編集画面のまま使えるので、 大きな画面で結果を見ながら描けます。展示や上映にも使えます。
iPad でステージマネージャがオンになっていると外部ディスプレイが拡張デスクトップとして扱われ、 この表示にならないことがあります。その場合は「設定」→「マルチタスクとジェスチャ」から ステージマネージャをオフにしてください。
iPad でも使えますか
使えます。iPhone と iPad の両方に対応しています。 画面の広い iPad では映像とマップを同時に大きく表示でき、Apple Pencil なら筆圧も使えます。
どんな映像が向いていますか
波、歩く人、車、風にゆれる布など、動きが続いているものがよく合います。 カメラは固定したほうが効果が分かりやすく、手持ちで画面全体が動くと効果が埋もれます。 スーパースローで撮った映像はとくに向いていて、時間を大きく引き伸ばしても 動きが飛ばずになめらかなまま残ります。
お問い合わせ
不具合の報告や機能のご要望は下記までお寄せください。
ryu.furusawa@gmail.com
https://ryufurusawa.com/contact
Time Flow Sketch
Reshape the flow of time inside a video by drawing. For iPhone and iPad.
About
Time Flow Sketch is a sketching app for reshaping the way time flows inside a video. Load a clip and the app expands it frame by frame into memory on the GPU, so the part you loaded is available all at once rather than one moment at a time. Out of that block of stacked frames it assembles a new video in which different parts of the picture sit at different points in the clip — column by column (Vertical slit), row by row (Horizontal slit), or pixel by pixel (Surface). A wave can break on the left of the frame while the right side has not started moving yet; a walking figure can trail a wake of its own earlier selves.
What decides all of that is a picture. The instruction medium is a grayscale image — the map — which you make with Draw, Gradient, Presets, From motion or Cut & slide. Its brightness is read as a number, and what the number means depends on which kind of map you are editing. In a Time map, brightness is a moment in the clip: black is near the start, white near the end. In a Rate map, brightness is a playback speed: with the default settings, black is frozen, mid grey is normal playback, and white is double speed. In the optional Space map, brightness is a position — which part of the frame to take the image from. Maps are handled as 16-bit grayscale, so a smooth tonal gradient really does become a smooth change in time rather than a staircase of visible steps.
This is the part ordinary editing cannot reach. In a normal editor, speed is a property of a whole clip and varies along the timeline: you set one value — 50%, reverse, freeze — and the entire frame obeys it. Here the instruction is spatial instead. A map carries a separate value for every pixel, so a single output frame can be assembled from the beginning, the middle and the end of your footage at the same time, and the borders between them are wherever your brush went. There are no keyframes to manage: the shape of the stroke is the shape of the distortion in time, and the result updates live while you draw, so you work by eye rather than by numbers.
Everything happens on the device. This build makes no network connections at all — there is no sign-in, no account, no in-app purchase, no analytics, and nothing is uploaded or collected. Your photo library is touched exactly twice: once to read the video you load, once to save the video you export. Rendering is local, on the device’s own GPU, which is also why long or high-resolution clips are demanding — every loaded frame has to fit in memory at the resolution and length set under Settings → Video Loading.
The app runs on iPhone and iPad, and it is localized: on a device not set to Japanese the controls, menus and captions are in English, matching the names used on this page. On iPad the extra room shows the video and the map at a workable size at once, and Apple Pencil adds pressure sensitivity, with a double-tap on the side of the Pencil to show or hide the brush palette. Connect an external display over HDMI or AirPlay and the finished result fills that screen by itself while your device keeps the editor — which is what makes the app usable for installation and live work as well as for producing files.
Getting started
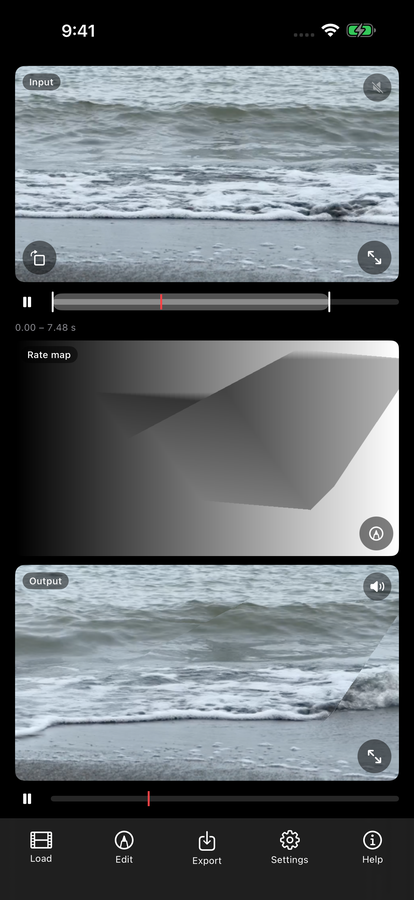
1. Reading the main screen
With landscape footage the screen stacks Input (your clip, untouched), the map, and Output (the result, playing live) from top to bottom; with portrait footage Input and Output sit side by side and the map goes below them. Turn the device sideways and the bottom bar moves to the right edge, with the playback bars laid over the videos.
Each video has its own playback bar. The one under Input also sets the range in use: drag the white handle at either end to trim it, touch inside the pale band to move the playhead, or press and hold and then drag to slide the whole range without changing its length. While you drag a handle, the Input picture shows the frame at that edge, so you can see exactly where the range begins or ends. The seconds in use are printed underneath.
A speaker button sits at the top right of each video, and only one of the two sounds at a time. A rotate button sits at the bottom left of the Input tile: each tap turns the source another 90° and re-imports the clip, which takes as long as a reload but leaves your maps alone. The button at the bottom right of each video (beside the speaker when the device is sideways) opens it full screen (see below).
The map tile is labelled with which map it is and carries a red playhead marking the row or column being read at that instant. Drag anywhere on the map to scrub straight there; playback pauses while your finger is down and resumes when you lift. The editor opens three ways: the pencil icon at the bottom right of the map, a tap on the Output video, or Edit on the bottom bar — which also holds Load, Export, Settings and Help, with Edit and Export dimmed until a video is loaded.
2. Loading a video
Tap Load and pick a clip from your photo library; the same button swaps in a different clip later. Every frame is converted on device at import, so lighter footage both loads faster and stays responsive while you draw. The overlay names the stage it has reached — Fetching from your photo library…, then Expanding frames… with a percentage and Converting and uploading to the GPU underneath it, then Loading the audio track… — and Cancel stops it at any point. Footage with continuous movement shows the effect most clearly.
You do not have to decide how much to load. For a new clip the app picks a resolution and a number of seconds from the video and from the memory free on the device; if the whole clip does not fit, it loads fewer seconds or skips frames, and an orange note under the Input bar says what it did — for example Of the … s clip, only …–… s was loaded. Tap the × to dismiss it. Change the choice under Settings → Video Loading. How the loaded part, the range in use and the length of the output relate to one another is explained step by step in How time processing works.
When loading finishes, Output looks exactly like Input. That is correct: the starting map for every mode is the pattern that gives back ordinary playback. The two pictures only diverge once you draw or generate. A new session starts on a Rate map in Surface mode, so painting straight away changes how fast each part of the picture runs.
Full-screen input and output
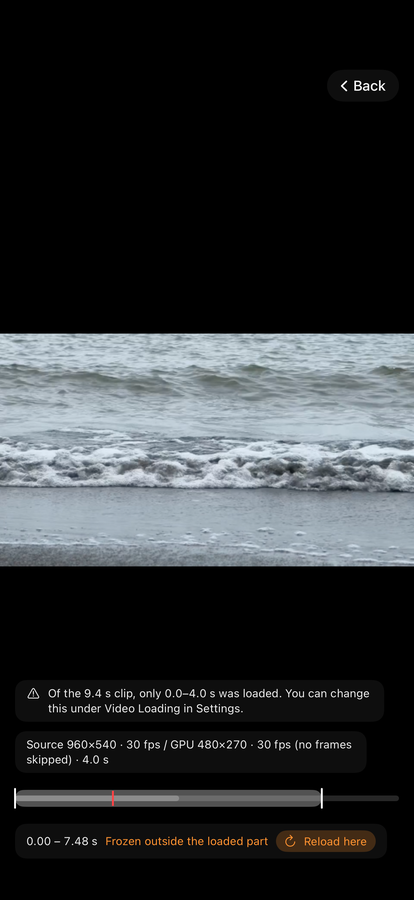
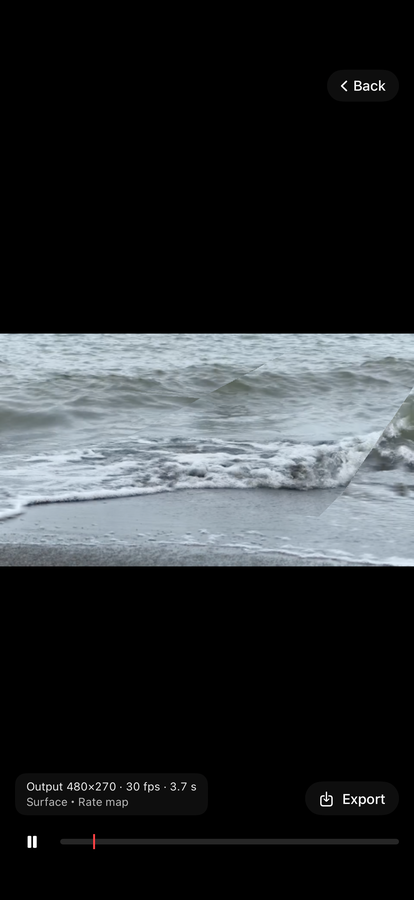
The full-screen button on either video fills the display with that picture; tap the picture to hide or show the controls, and tap Back at the top right or swipe down to return. The Input view carries the same range bar as the main screen — handles, press-and-hold to slide, touch to scrub — with the seconds underneath, and a line describing what is loaded: the source’s size and frame rate, the size and frame rate held on the GPU, whether frames were skipped, and the seconds loaded. Tap that line to open the Video Loading settings on their own and reload from there. The Output view has play/pause and a playback bar, a line giving the output’s size, frame rate, length and current map and mode, and an Export button, so you can check a result at full size and write it out without leaving.
3. Drawing or generating a map
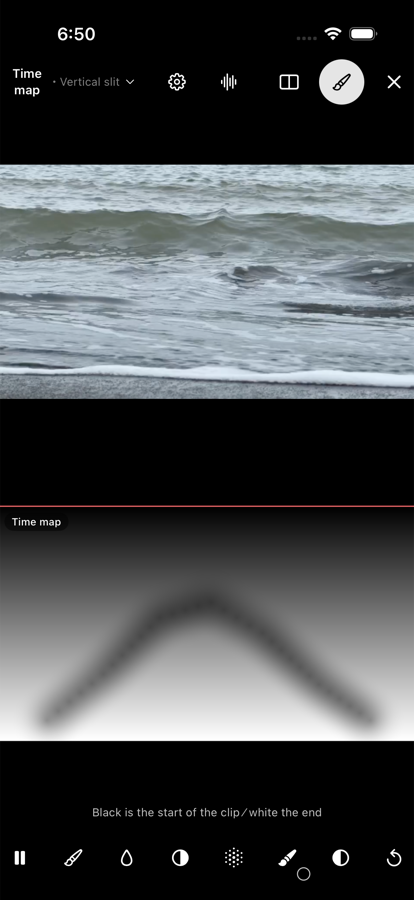
The editor opens full screen. The row across the top carries the map-and-mode label at the left, the gear (Parameters), the waveform (Sound), the layout menu, the method button, and an X at the far right that closes the editor. Nothing needs saving — the map is already applied.
Trace the map with a finger or Apple Pencil. The brush button opens a palette holding the Bleed brush toggle, Fill, five tones — Black, Dark grey, Grey, Light grey, White — and Smudge. Brush size runs 1–300 px, with Strength, Gamma and Blur alongside.
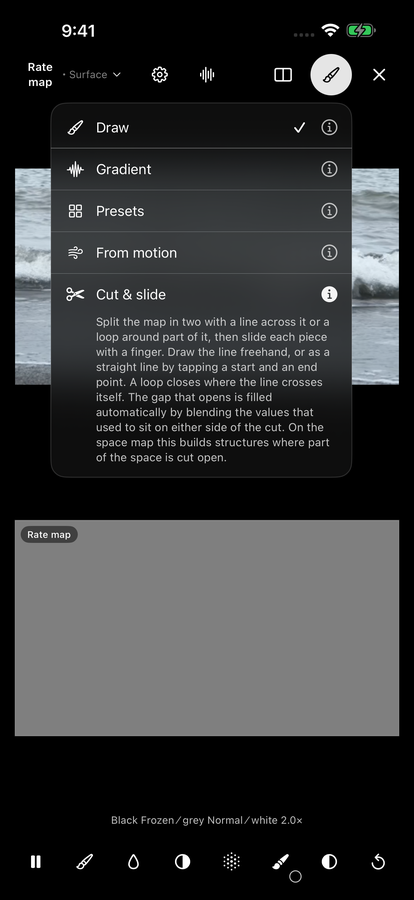
The caption under the map spells out what brightness means with your current settings — “Black is the start of the clip ⁄ white the end” — and rewrites itself when you change the map or the mode. The button at the top right opens the list of methods: Draw, Gradient, Presets, From motion and Cut & slide. The i at the end of each row opens a short explanation without leaving the list. Anything you generate can be drawn on afterwards.
4. Exporting your first result
Tap Export. Exactly what the Output view is showing is written out as an H.264 .mp4 with its audio and saved to your photo library, with a progress bar over the output while it works — leave the app open until it finishes. The length follows the map and mode (for a time map, the seconds in the range in use) and the Duration slider in the editor’s Parameters panel (the gear icon). Settings shows the resulting Export length next to Frame rate under Export, while Include audio and Also save the map as a 16-bit PNG sit under Export options. The video is written at the Resolution chosen under Video Loading. If you declined the Photos permission, a share sheet opens instead.
Maps and modes
Two separate choices decide what a grayscale image does to your footage: the kind of map — what brightness is taken to mean — and the mode — how the map is laid over the picture. Both live behind one label at the top left of the editor, which reads something like Rate map · Surface. Tap it and a menu opens whose top section is headed Map (Time map, Rate map, Space map (optional)) and whose lower section is headed Modes — or Mode (space uses slits only) when a space map is what you are editing.
The app stores a separate image for each kind. Switching from Time map to Rate map recalls whatever is sitting in that slot instead of reinterpreting what you just drew, so the switch never overwrites your work. Maps are held as 16-bit grayscale — 65,536 levels — which is why a gentle gradient produces a genuinely gentle change in time rather than visible steps.
The settings that belong to the current kind and mode are in the Parameters panel (the gear). Each setting there has an i button that opens an explanation written for the mode you are in, since the same control can mean different things in different modes.
Time map — brightness is a moment
Black points at the beginning of the range in use, white at the end, and every grey in between is a moment in between. The caption under the map in the editor always states the current reading: “Black is the start of the clip ⁄ white the end.”
In the slit modes, Time from and Time to in the Parameters panel (the gear icon) narrow the span the two ends of the scale point at. These are the same two values as the white handles on the playback bar under the input video, so moving either one moves the other; setting Time from above Time to plays in reverse. Once you narrow the range, the caption switches to real seconds — “Black 2.0s into the clip ⁄ white 6.5s” — and Reload only the range in use, just below, re-imports exactly that span at the same resolution. Because fewer seconds are loaded, fewer frames need to be skipped to fit.
A time map always plays at natural speed: at a Duration of 1× the output lasts exactly as long as the range in use, and 2× shows the same range at half speed.
In Surface mode a time map means something different: a relative shift rather than an absolute position. Shift (s), 2 seconds by default, is the total spread. Black runs half of it earlier than the current moment, mid grey is unchanged, white half of it later, and time wraps — a pixel pushed past the end of the range in use reappears at its beginning.
The default time map is whichever pattern gives back ordinary playback: a Top → bottom ramp under a vertical slit, Left → right under a horizontal one, and All grey under Surface. Reach for a time map when you want particular places in the frame pinned to particular moments — this half of the picture in the past, that half in the present.
Rate map — brightness is a speed
Here brightness sets how fast time runs, not where it is. In the slit modes the app accumulates that speed along the output time axis, so the moment shown at any point is the sum of everything before it: change one band high in a vertical-slit map and everything below it moves too.
Speed is 1 + (brightness × 2 − 1) × Rate range. With the default Rate range of 1.0 that makes black a hard freeze, mid grey ordinary playback, and white 2.0× fast; push Rate range to 3 and black becomes 2.0× reverse while white becomes 4.0×. The solid presets report the resulting speed in words, and the four ramps report both ends at once using the shortened forms — Frozen, Normal, Slow, Fast, Reverse, Slow reverse, Fast reverse. Start point chooses where in the range the accumulation begins. If the resulting path would run off either end of the range, the app slides the whole path back inside, and compresses it only when sliding is not enough — so the result never simply sticks against the first or last frame (in that case Start point has no effect).
In Surface mode every pixel becomes an independent clock. Black rate and White rate (−4 to +4, default 0 and 2) are interpolated by brightness, so out of the box black is frozen, mid grey plays at normal speed and white at double speed — the same reading as a slit rate map at a Rate range of 1.0. Negative values run backwards. Anchor — Start, Middle, or End, Middle by default — is the instant in the output at which every pixel agrees, and Anchor at picks which point of the range they agree on; switching Anchor sets Anchor at to match (0, 0.5 or 1). Moving Anchor at away from that value can make the fastest pixels jump partway through the loop.
The default rate map is All grey in every mode, which is plain normal playback under a slit and under Surface alike. Reach for a rate map when the interesting question is how fast a region moves rather than which frame it shows: one corner crawling, another racing, a third running backwards.
Space map — brightness is a place
The space map is optional, and it bends space rather than time: brightness says where in the frame to take the picture from. It is applied on top of whichever map — time or rate — is currently driving the warp, never instead of it.
It is always applied slit-wise. Surface disappears from the mode picker while the space map is the thing you are editing, and if the time side is set to Surface the space map behaves as a vertical slit. Under a vertical slit, black is the left edge of the source and white the right; under a horizontal slit, black is the top and white the bottom.
Its defaults are the identity ramps — Left → right for a vertical slit, Top → bottom for a horizontal one — which is exactly why ignoring the space map changes nothing. Repaint it All grey and every column shows the same column of the source, smearing one slit across the whole frame; Right → left mirrors the picture; a ramp running along the time axis is labelled Slit scan. Once you have edited it, a Space map in use button appears on the main screen and its thumbnail sits beside the time map. To stop using it, open the method list while editing the space map and choose Reset to default: the space map returns to its unedited state and disappears from the main screen.
The three modes
| Vertical slit | The map’s vertical axis is output time and its horizontal axis is position across the frame. Each output column takes its moment from one column of the map, read at the height the playhead has reached — the red line drawn across the map on the main screen. Slit modes take the nearest source frame rather than blending two, which keeps thinned-out frames from ghosting together. |
|---|---|
| Horizontal slit | The same idea with the axes swapped: the map’s horizontal axis is output time, its vertical axis is position down the frame, and the red line sweeps left to right. |
| Surface | No time axis at all. The map lies directly over the picture and every pixel is shifted in time independently, the whole image at once, on every output frame. The shape you draw becomes the distortion in time directly, which makes it the easiest mode to read. Surface blends between neighbouring frames rather than snapping to the nearest one, so motion stays smooth. |
Kind and mode are independent, so there are eight useful combinations — nine minus space-plus-surface, which does not exist. The same drawing behaves completely differently across them: a Top → bottom ramp is ordinary playback under a vertical slit, a still frame with a different moment in every row under a horizontal one, and a smooth top-to-bottom time ramp under Surface. Because of that, changing the mode rebuilds any map you have not edited into the new mode’s normal-playback default; maps you have drawn on are left exactly as they are. Loading a different video rebuilds all three, edited or not, at the new clip’s aspect ratio.
One consequence catches people out. For a rate map in the slit modes, the map’s size along its time axis — height for a vertical slit, width for a horizontal one — is the duration of the result, so a map built for a 16:9 clip gives roughly a 17-second output under a vertical slit and a 30-second one under a horizontal slit: same footage, same drawing, same settings otherwise. A time map is different: its output lasts as long as the range in use. The numbers, and the controls that change them, are under How long the export will be and Settings → Map resolution (time detail).
Building a map
The round button at the top right of the editor chooses how you build the map. It opens a list of five methods — Draw, Gradient, Presets, From motion and Cut & slide — each with an i at the end of its row that expands a short explanation underneath; tap the row itself to switch. While you are editing the space map the list ends with Reset to default, which has its own i. Switching methods changes only the row of tools along the bottom. The map you are editing, the mode it is applied in, and the live preview all stay as they were. The caption just above the tools always states what black, grey and white mean for the current map and mode, so it is worth reading again after any change of mode or parameter.
Every method’s tool row begins with a play/pause button. Draw, Gradient, Presets and From motion end with a counter-clockwise reset arrow that returns the map to the current mode’s default; Gradient and From motion also carry a clockwise refresh button that re-runs the generation. Outside Draw and Cut & slide, a drag on the preview scrubs the playhead.
The layout menu, next to the method button at the top right, has four options. Side by side is the default and shows the video and the map as two panes. Overlay lays the map over the picture at partial opacity, which is how you land a stroke on a particular object rather than a particular part of the frame. Map only and Video only show one layer at a time. The choice is independent of what an external display is showing — that always shows the output alone.
Draw
Trace over the map with a finger or Apple Pencil. A stroke does not replace the tone underneath; it eases every pixel under the brush towards the tone you picked, most strongly at the centre of the brush and fading to nothing at its edge. Tone therefore builds up over repeated passes and never overshoots the target, which is what makes soft shading possible.
There is no undo. Nothing in Draw takes a stroke back. A stroke can only be painted out — pick the tone that was there before and work at low Strength until it is gone — or the whole map reset with the counter-clockwise arrow at the end of the tool row, which costs you the entire drawing. There is no separate eraser either; painting with White pulls the map back to white. This is also why Gamma, Blur and invert are built to stay reversible until you commit them, below.
Smudge works differently from the tones — it picks up the tone already under the brush and drags it along the direction of travel, blending as it goes, which is the quickest way to soften a boundary you have already drawn. Fill expands into the seven preset patterns and repaints the entire canvas with one of them without leaving Draw.
| Brush | 1–300 px. This is the radius, measured in map pixels rather than screen pixels, so on a default map (512 px on the short edge) a brush of 300 covers the whole frame at once. The slider is deliberately non-linear — size follows the square of the slider position — so the first half of its travel covers everything up to about 75 px, and the default of 80 sits near the middle. |
|---|---|
| Strength | 0.05–1, default 0.3. How far a single pass moves towards the chosen tone. Low values let you build up tone gradually; at 1 a single stroke lands almost the full tone at the centre of the brush. |
| Gamma | 0.3–3. Bends the tonal curve of the whole map, pushing the mid tones darker or lighter while black and white stay put. |
| Blur | 0–10. Softens the whole map. The scale is exponential, reaching a radius of well over a hundred pixels at the top, so the useful range for gentle smoothing is the bottom third. |
Gamma, Blur and the invert button are non-destructive with respect to your strokes. They are a live adjustment applied on top of the raw canvas — blur first, then gamma, then invert — and they keep tracking whatever you paint afterwards. The map the app renders, plays and exports already includes them; what stays untouched is the drawing underneath, so while you are on that map, dragging the three controls back to neutral restores the raw strokes exactly. Move any of them off neutral and a button appears reading Apply adjustments (overwrites the map). Tapping it bakes the adjustment into the drawing canvas and returns the three controls to neutral, so the blurred or inverted result becomes the new base and you can paint fresh strokes on top of it at full contrast. That step is one-way — there is no undo for it either — so audition first and apply once you are sure.
With Apple Pencil, pressure scales the brush. A finger always counts as an average press, so a Pencil can go both thinner than a finger stroke (a light touch narrows the brush to roughly a sixth of the set size) and thicker (hard pressure widens it to about one and a half times). The Bleed brush exists for the finger case: turn it on, hold still, and the app keeps laying down tone at that point every display frame while the affected radius grows — about three times the brush size after four seconds or so. Each deposit is very light, so the result is a soft pool of tone spreading outward rather than a hard dot. Double-tapping the side of an Apple Pencil opens and closes the palette, so you can change tone without reaching for the toolbar.
Playback pauses automatically the moment a stroke begins and resumes when you lift, so the device is not rendering video and computing brush strokes at the same time. That is what keeps the line following your finger.
Gradient
Choosing Gradient immediately lays a regular wave over the current map, and every slider regenerates it live as you drag. The pattern is a sine wave: brightness runs smoothly from black to white and back, measured along a direction you choose.
| Amplitude | 0–1. How far the wave swings. At 1 it reaches full black and full white; at 0 the map is flat grey and only Offset has any effect. |
|---|---|
| Period | 8–1024 px. The length of one complete cycle, in map pixels. Short periods give a striped, stuttering result; long ones a single slow ramp. |
| Angle (°) | 0–360. The direction the wave travels. 0° runs it top to bottom, producing horizontal bands; 90° runs it left to right, producing vertical bands; anything between gives diagonals. |
| Phase (°) | 0–360. Slides the pattern along its own direction without changing its shape. Use it to move where the black and white bands fall relative to the subject. |
| Offset | −0.5 to +0.5. Shifts the centre level of the wave away from mid grey, biasing the whole map dark or light. A small amplitude combined with an offset gives a gentle ripple around one chosen moment instead of a full sweep through the clip. |
The grid button offers five quick patterns — Vertical stripes (90°), Horizontal stripes (0°), Diagonal (45°), Fine stripes and Gentle waves. The first three set both period and angle; the last two change only the period and keep the angle you are already using. What a gradient does depends entirely on the mode: on a time map in vertical slit, a wave running down the frame makes the clip run forwards, then backwards, then forwards again, once per cycle, while the same wave running across the frame instead freezes each column at a different moment.
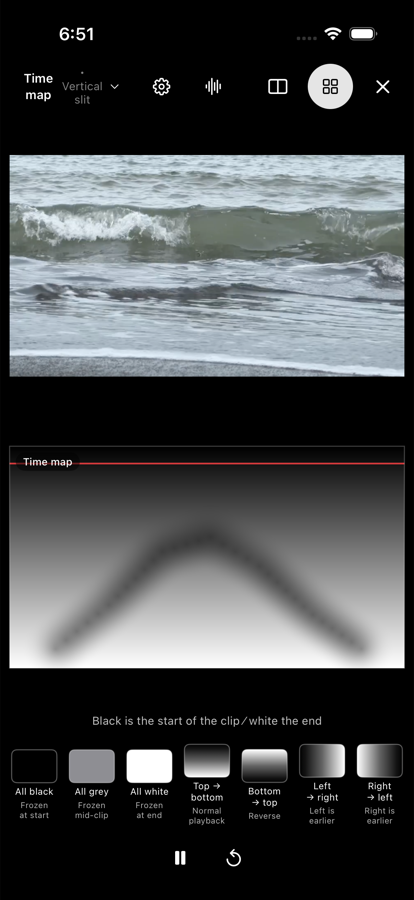
Presets
Seven buttons repaint the whole map in one tap: All black, All grey, All white, Top → bottom, Bottom → top, Left → right and Right → left.
Each button carries a thumbnail of the pattern, its name, and — most usefully — a line underneath saying what that pattern will actually do given the map kind, the mode, and the parameters you have set. Those labels are computed rather than fixed, so they change the moment you change anything that matters.
On a time map in vertical slit, where the map’s vertical axis is output time, they read like this:
| All black | Frozen at start |
|---|---|
| All grey | Frozen mid-clip |
| All white | Frozen at end |
| Top → bottom | Normal playback — the ramp runs along the time axis, in the forward direction |
| Bottom → top | Reverse |
| Left → right | Left is earlier — this ramp runs across the frame instead, so each column freezes at a different moment |
| Right → left | Right is earlier |
Switch the same map to horizontal slit and the two groups trade places, because the time axis is now horizontal: Left → right becomes Normal playback and Top → bottom becomes “Top is earlier”. On a surface time map, where brightness shifts each pixel a little either side of now, the three solid tones report the offset in seconds taken from Shift (s) — with Shift at 3 seconds they read “1.5s earlier”, Normal playback and “1.5s later” — while all four ramps read simply “Time ramp”.
On a rate map the labels are driven by Rate range in the Parameters panel (or by Black rate and White rate under Surface), which sets what black and white mean. With the range at 1.0, black is frozen and white is double speed, so All white reads “2.0× fast”; widen the range to 1.5 and black passes through zero into reverse, so All black now reads “Slow reverse”. The four ramps show both ends at once — joined by an arrow when the ramp runs along the time axis, or by a wave dash when it runs across the frame, since in that case the two speeds coexist in different parts of the picture rather than following one another.
From motion
This builds the map out of the footage itself. On selecting it, the app walks the whole loaded clip once on the GPU, accumulating how much each pixel’s brightness changes from frame to frame; busy areas come out light, still areas dark. The result of that pass is cached for the loaded clip, so every slider afterwards responds instantly.
The clock button toggles between the two states the caption names, Still and History. In Still, the bar-chart button switches what is accumulated, which the same caption reports: average favours sustained motion, so something that moved throughout the clip outweighs a single event, while maximum catches anything that moved at all, even for one frame, which is better for isolating a single gesture or a passing object. The map is then normalised between its 1st and 99th percentile, so one bright flash or a cut cannot flatten everything else into grey. Gamma and Blur shape the result and the invert button flips it, making motion dark instead of light. Unlike in Draw these are part of the generation itself, so there is nothing to apply — the map is rebuilt each time you move a slider.
History is a different kind of map altogether. Instead of one image summarising the whole clip, the app builds one map per frame from a decaying accumulator: each frame adds the new movement and fades what came before. Trail (s) (0.5–10, default 3) sets how long that fade takes. The result is a map that moves — a bright trail appears where something passes and dims over the next few seconds, so the time warp itself shifts continuously as the clip plays instead of standing still. The map thumbnail updates as you watch, and consecutive frames of the map are cross-faded, so even a clip whose frames were thinned at import changes smoothly rather than stepping.
Three limits are worth knowing. History works only in Surface mode: a slit reads a single row or column of the map at each instant, so a moving map would add nothing there. In the slit modes the clock button is dimmed and the caption says History is available only in Surface mode, and switching an active history map to a slit mode stops it. History applies to time and rate maps only — the button is hidden while you are editing a space map, which always uses the still analysis. And the per-frame data is held at reduced resolution (at least half, and further reduced for long clips, to stay inside a fixed memory budget), so a history map is softer than a still one. Applying any fixed image afterwards — a preset, a gradient, a reset, or switching to Draw or Cut & slide — stops the moving map and leaves the state it had reached behind as an ordinary still map.
Cut & slide
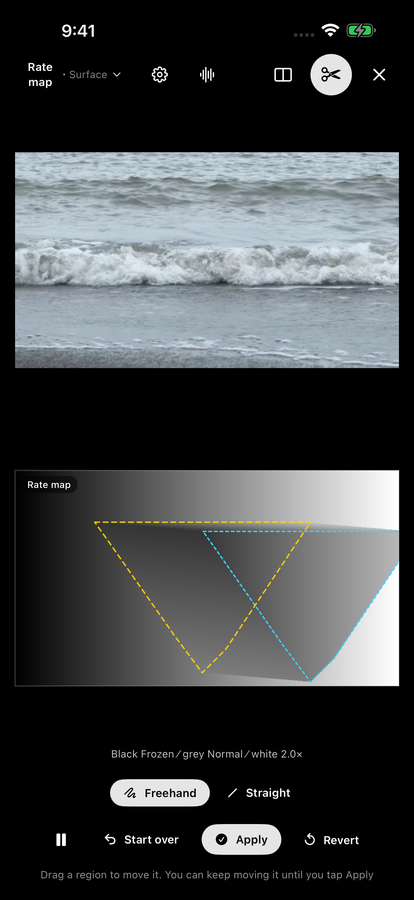
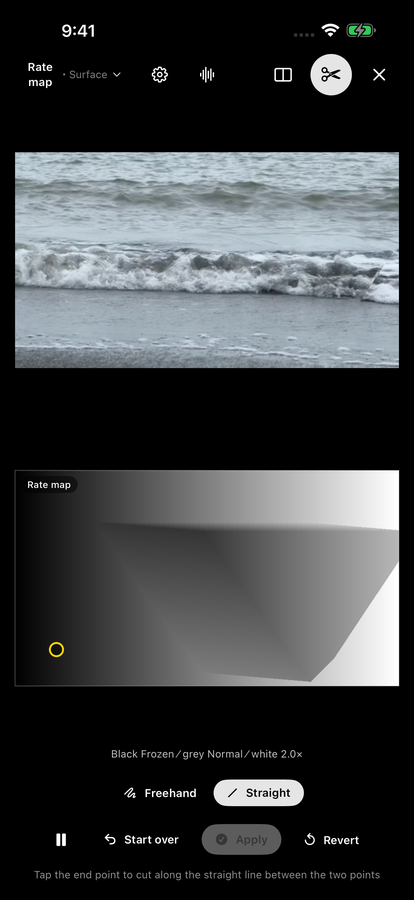
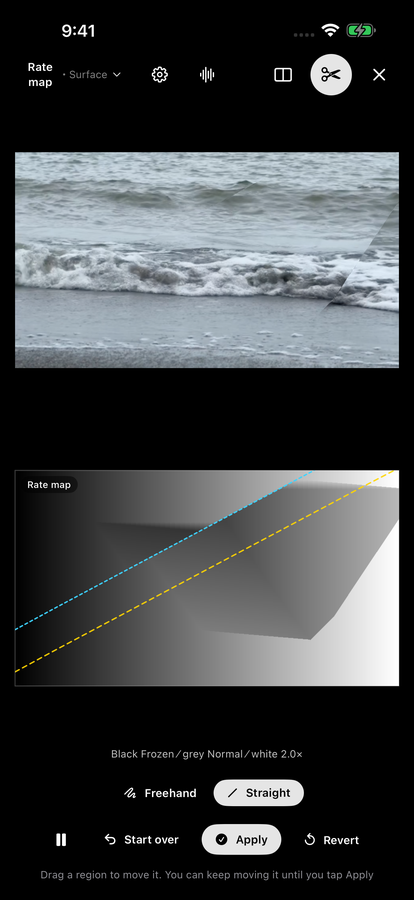
This method splits the map in two with a line and lets you slide the pieces apart. The gap that opens is not left empty: the values that used to sit on either side of the cut are joined across it and blended, so the edge looks stretched rather than torn, and a piece dragged far away stays connected to where it came from by a band. On a time or rate map that stretches one region of time away from its neighbour; on the space map it builds structures where part of the picture is cut open.
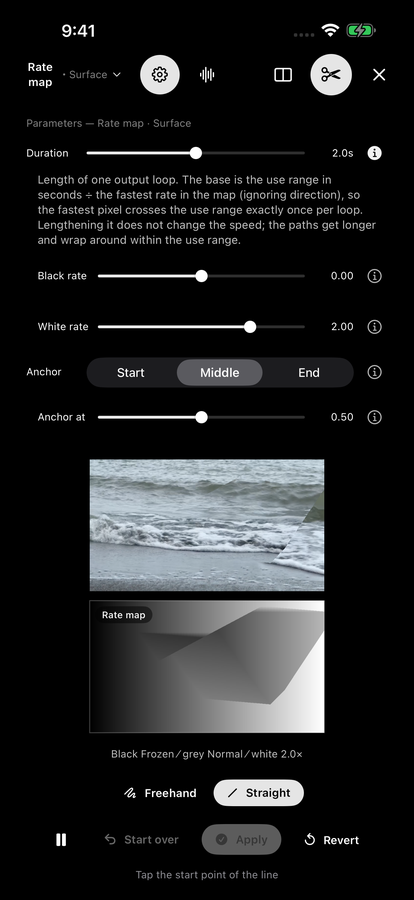
A small palette above the tool row chooses how the line is drawn. Freehand takes the line you trace: draw it across the map from edge to edge (you can start and finish outside the map, and an end that stops inside is extended to the edge in the direction it was travelling), or draw a loop around a region. A loop closes where the line crosses itself, so its start and end do not have to meet exactly, and the tiny loops a wobbling fingertip makes are ignored. Straight takes two taps: tap the start point, which is marked, then the end point, and the map is cut along the straight line through them, extended to the edges — a faint dashed line previews where it will run. The caption under the buttons tells you which step you are on, and turns orange for a few seconds if a line could not split the map.
Once the map is split, drag either piece; the caption reads Drag a region to move it. You can keep moving it until you tap Apply. The original cut is shown as a yellow dashed line and its moved position as a cyan dotted one. Lifting your finger commits nothing, so you can grab and move again as often as you like. A piece enclosed by a loop always stays on top; otherwise the piece you dragged last does. Playback pauses while you touch the map, as in Draw. The tool row holds:
| Start over | Throws away the line and the offsets and lets you draw a new line on the same base. In Straight mode it also cancels a start point you have placed. |
|---|---|
| Apply | Makes the current result the new base, ready for another cut. |
| Revert | Returns the map to how it was when you opened Cut & slide, discarding every cut since. |
Combining the methods
The methods are not symmetrical. Anything generated can be drawn over: entering Draw seeds its canvas from whatever the map currently holds, so a gradient, a preset or a motion map becomes the base and your strokes add to it. Cut & slide likewise starts from the current map, drawn or generated. The reverse does not hold — choosing Gradient or From motion after drawing rebuilds the map from scratch and discards the strokes, with no undo to get them back. If a drawing is worth keeping, export it first: see Also save the map as a 16-bit PNG.
Sound
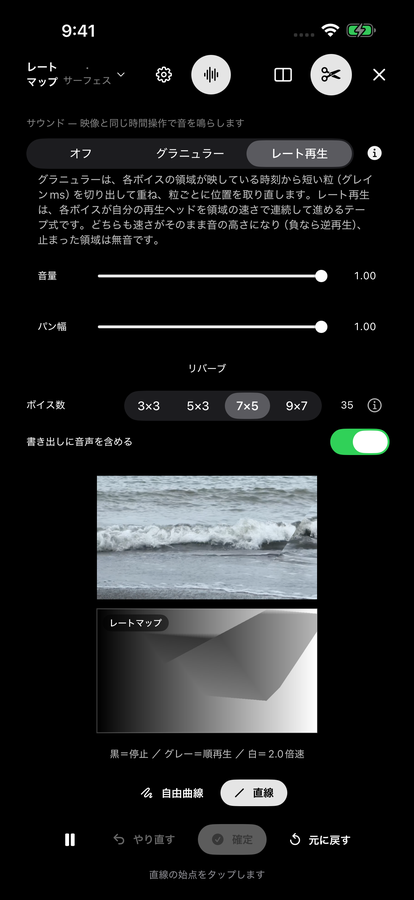
If the clip you loaded carries an audio track, that audio is put through the same time manipulation as the picture. The frame is divided into regions — a grid in Surface, strips in the slit modes — and each region sounds according to how time is running in that part of the image — a region running backwards plays backwards, a region racing ahead climbs in pitch. Nothing is synthesised from scratch: every sound you hear is the clip’s own recording, read at a different place and a different speed for each region.
The two speaker buttons
A speaker button sits at the top right of each video. The one over the input turns on Source audio; the one over the output turns on Result audio. Only one of the two plays at a time — switching on either switches the other off, since both are built from the same recording and layering them only doubles it.
- Result audio is already on when a clip with an audio track finishes loading, set to Rate playback. That is the synthesis described below. Switch it off and on again and it returns to whichever method you used last.
- Source audio is off until you turn it on. It plays the material untouched at normal speed, looping the range in use you set with the white handles on the bar under the input, and turning it on switches the result audio off. While it is on, the input picture takes its playhead from the audio rather than from its own timer, so the two cannot drift apart.
- Both buttons are dimmed and inert when the clip has no audio track.
What the result audio is doing
For every output frame the app evaluates the same map arithmetic the picture uses, but on the CPU and averaged over each region. That gives each region one position in the recording — 0 is the start of the clip, 1 the end. Comparing that position with the previous frame’s gives the region its playback rate, clamped to a range of ±4× so that an extreme map cannot run away. Each region is then a voice: one reader moving through the recording at that position and that rate.
- In Surface the regions are a grid, and a cell’s column sets its stereo position, from hard left in the leftmost column to hard right in the rightmost. Rows are not panned, so the stereo image is a map of the frame from left to right and you can hear where in the picture a change is happening. Each cell follows the average brightness of its own region, so the whole frame moves through the clip in a shape rather than a line.
- In Vertical slit the regions are strips running left to right, panned by position. In Horizontal slit they are strips running top to bottom, which have no left or right, so both channels carry the same signal. In both slit modes, positions are read from the row or column of the map the red line is currently crossing, so the sound changes as the scan advances through the map.
- When every region is showing nearly the same moment — ordinary playback — the voices give way to the original stereo recording played straight through, and they fade back in as the moments spread apart. An untouched map therefore sounds like the recording itself.
Granular and Rate playback
Open the Sound panel with the waveform icon at the top of the editor. The segmented control at the top of it chooses Off, Granular, or Rate playback — the same two methods the output speaker toggles between — and its i explains both. Both read the recording at the region’s rate, so in both of them speed shows up as pitch, negative speeds play backwards, and a region at a dead stop is silent; what differs is how often a voice is pulled back to where the picture says it should be.
| Granular | Each voice plays two overlapping grains under a raised-cosine window, and each grain is re-seeded to the region’s current position every Grain (ms). A granular voice therefore re-articulates constantly and can never drift away from the picture, which is what keeps it locked to a fast-moving map. Grain (ms) runs 20–200 and is only shown for this method: short grains track fast changes crisply but sound grainier; long grains are smoother but smear detail. |
|---|---|
| Rate playback | Each voice reads the recording as one continuous stream, like tape, so half speed is an octave down, double speed an octave up, and negative rates run the recording backwards. It only jumps back to the picture’s position when it has drifted more than about a third of a second, and does so behind a short fade rather than a click. |
Granular suits maps that change quickly and material whose identity matters — speech, music, a single recognisable sound — because the constant re-seeding keeps every region pinned to the moment its part of the frame is showing. Rate playback suits material read as texture — water, traffic, wind, a crowd — and is the clearest way to hear what a rate map is doing, since the speed of each region arrives as pitch, uninterrupted.
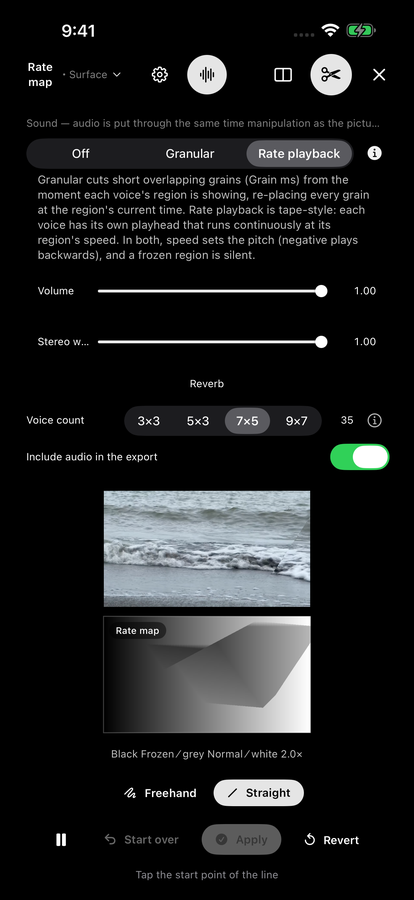
Reverb
Reverb is off until you turn it on, and it is not a fixed room. The wet amount follows the spread of time across the frame: the app measures the gap between the earliest and the latest region in the current frame and drives the reverb from it. A flat map, where the whole frame sits at the same moment, stays dry. A map that scatters the frame across the clip opens the reverb up, reaching full depth once the spread is around half the clip’s length. The value is smoothed, so the tail swells and recedes with the map instead of jumping. Depth sets the ceiling that spread can reach; the tail itself is a fixed two and a half seconds behind a short pre-delay. In practice this means scattered time is heard as space.
Voices, and what they cost
In Surface, Voice count chooses how finely the frame is divided: 3×3 (9), 5×3 (15), 7×5 (35, the default) or 9×7 (63). In the slit modes the control becomes Voice divisions, a stepper from 1 to 16 (default 7) that sets how many strips the frame is split into at right angles to the slit; a note beside it says whether they are split left to right or top to bottom. More voices resolve the map more finely and, where stereo comes from their position, give a wider and more detailed stereo image. Fewer voices average a larger area into each one, which sounds broader and blunter. Under a Horizontal slit the output is the same in both channels, so Stereo width is dimmed, with a note explaining why.
Every voice is synthesised sample by sample on the audio thread while the GPU is warping the picture, so 63 voices cost roughly seven times what 9 do. If the audio starts crackling or dropping out, or the preview stutters after you raise the count, step back down — the setting is free to change at any time. The summed voices are soft-clipped before output, so a loud map compresses rather than tears, but pull Volume down rather than leaning on that.
| Volume | Level of the result audio, 0 to 1. |
|---|---|
| Grain (ms) | Grain length, 20–200 ms, default 85. Granular only. |
| Stereo width | 0 places every voice in the centre; 1 spreads them fully left to right. Dimmed under a Horizontal slit. |
| Reverb | The switch, and Depth — the ceiling the spread of time can drive it to. |
| Voice count / Voice divisions | Surface: a grid of 9, 15, 35 or 63 cells. Slit modes: 1–16 strips. Both have an i explaining how the voices are laid out in the current mode. |
| Export audio | Include audio in the export — whether the exported file carries a soundtrack. The same switch appears as Include audio under Settings → Export options. |
In the exported file
These settings carry through to the export. The export does not record what your speakers played; it runs the same synthesis offline, frame by frame, against the same region positions, so the file matches what you heard in the preview — method, grain length, stereo width, reverb, voice count and volume included.
Two things will give you a silent file. If Result audio is off when you export, nothing is written. And because turning on Source audio switches the result off, exporting while you are monitoring the untouched material also produces silence. Turn the output speaker back on before you export.
If you hear nothing
- The clip has no audio track. The panel says so, and the speaker buttons stay dimmed. Clips rendered out of editing apps often arrive without one.
- The audio was skipped at import. Loading the audio track is the last stage of loading a video. Cancel during it and the app tells you it has the video but not the sound; load the clip again to get the audio.
- A frozen map. A region at a dead stop is silent with either method, because nothing is moving past the head. Paint the map away from a hard freeze.
- Volume is at zero, or the method is set to Off. Both leave the picture running normally.
- The app plays through the playback audio category, so it sounds even with the ring/silent switch set to silent. If your device is otherwise quiet, that is not the cause.
Exporting and quality
Export, on the bar at the bottom of the screen or in the full-screen Output view, renders exactly what the output view is showing and writes it as an H.264 .mp4, which is then saved to your photo library. The render is not a copy of the preview: the app walks the output from beginning to end one frame at a time and draws each frame at full quality, so it takes longer than the piece is long. Playback stops while it runs, a progress bar reads Exporting…, and the button stays disabled until it finishes. Keep the app open while it runs; a longer piece takes proportionally longer. A video cannot be loaded while an export is running.
When it is done the app confirms that the file went to your photo library. If you declined the photo library permission the work is not lost: a share sheet opens with the finished file instead, so you can send it to Files, AirDrop it, or hand it to another app. The same happens if the save itself fails.
Sound is written into the same file as stereo AAC, and it is the manipulated sound — the grains or rates are recomputed offline against the same per-region times the picture uses, so the export matches what you heard in the preview rather than the original audio. Turn it off with Include audio in the export, in the editor’s sound panel or as Include audio under Export options in Settings. Muting the output, or setting the sound method to Off, also leaves the file silent.
How long the export will be
You never type the length in. It is a base length that the current map and mode work out for themselves, multiplied by the Duration slider in the editor’s Parameters panel (the gear icon). The slider runs from ¼× to 4× and shows the result in seconds next to it; its i explains the base for the mode you are in, and Settings also reports the result as Export length.
| Time map, any mode | The seconds in the range in use — the span between the white handles. The result always plays at natural speed at 1×. |
|---|---|
| Rate map, Vertical slit | The map’s height in pixels, read as 30 px per second and clamped to 2–120 seconds. |
| Rate map, Horizontal slit | The same, but from the map’s width — the time axis is horizontal in this mode. |
| Rate map, Surface | The seconds in the range in use divided by the fastest rate anywhere in the map, ignoring direction — the time the fastest pixel takes to cross the range exactly once. A map containing faster areas gives a shorter output. Rates below 0.1× count as 0.1×, so an almost black map runs at most ten times the range. |
For a time map, what you are really choosing with the handles is the length. Until you touch a handle the range fits itself inside the loaded part — in the slit modes to the length the map’s time axis suggests, in Surface to the whole loaded part — so the default already plays at natural speed; once you move one, it stays where you put them.
For a slit rate map the shape of the map is the shape of the time: a tall map is a long, slow video, a wide map a short one with finer detail across the frame. Changing the map’s dimensions is the honest way to change that length, and the controls for that live under Settings → Map resolution (time detail). Stretching the Duration slider instead is perfectly usable, but understand what it does: above 1× the map is resampled between its own pixels, so the steps in time get softer the further you push it. Under a slit, while the accumulated path still fits inside the range the speed is unchanged; once it no longer fits, the whole path is scaled down evenly and plays slower. Under Surface, lengthening a rate map does not change the speed; the paths simply get longer and wrap around within the range.
Frame rate (Settings → Export) is 24, 30 or 60 fps. It changes how many frames are written and how long the render takes, not how long the result plays.
Resolution, and why it is not your camera’s
The export comes out at the size of the working copy held in memory, not necessarily the size of the file you picked. That size is fixed at import by Resolution in Settings → Video Loading: Full, 1/2 or 1/4 of the source’s dimensions, with the actual pixel size of each shown under the buttons. The aspect ratio and any rotation follow the source, and the app never scales up — Full is the source’s own size. The bit rate scales with the frame area — about 11 Mbps for 1280×720, and never less than 6 Mbps — so compression is rarely what you are seeing; the working resolution is.
Changing Resolution or Seconds to load does nothing to the video already loaded until you tap Reload with these settings; the preview and the export both pick up the result. Watch the Memory line under them: it tells you what the combination will ask of the device, and Frames tells you whether frames will be skipped to fit, before you commit to it.
The range in use is part of the export
The white handles on the bar under the input video decide which part of the source the render draws from, and the range is shown in seconds underneath. It applies in every mode, not only the slit modes — the editor’s Time from and Time to sliders are the same two numbers. Press and hold the band and drag to slide the whole range without changing its length.
The range can reach beyond the part of the clip that is loaded, which the bar shows slightly brighter when only part of the clip is in memory. Moments outside the loaded part cannot move — they stick to the frame at its edge — so the caption then reads Frozen outside the loaded part, with a Reload here button beside it. Tapping it reloads at the same resolution and the same number of seconds, placed so the range in use sits in the middle (if the range is longer than that, the range’s length is loaded, skipping frames if needed). The same notice appears under the range bar in the full-screen Input view, and below both videos when portrait footage puts them side by side.
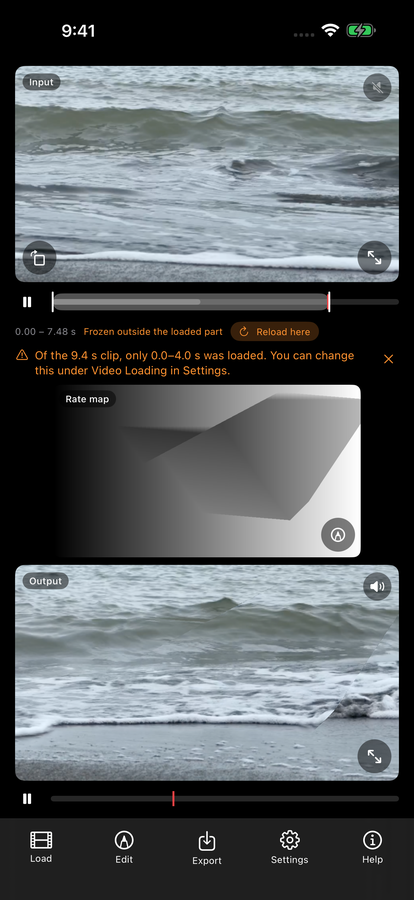
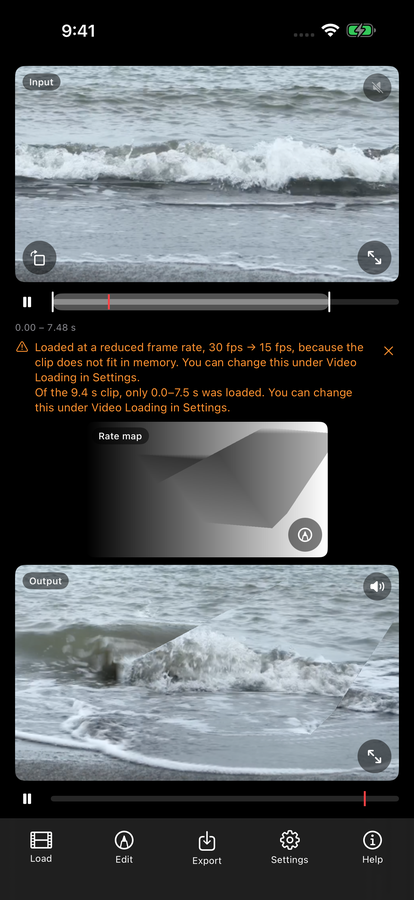
Before a final export in a slit mode with a time map, it is also worth tapping Reload only the range in use in the Parameters panel, under Time from and Time to. It re-imports exactly the seconds between the handles at the same resolution; fewer seconds in memory means fewer frames need to be skipped, which gives the time axis more real frames to land on. The button is built only for that combination — on a rate map or in Surface it is not there.
Also save the map as a 16-bit PNG
This toggle, under Export options in Settings, makes the export produce a second thing: a
share sheet containing the maps as single-channel 16-bit grayscale PNGs. The time or rate map
is always written; the space map comes too, but only if you have actually edited it. The filename carries the
map’s role — time_0-512, rate_1.0 or space_912 — which
is what the desktop version reads them back by. For a time map that number is the map’s height in pixels,
which is the time-axis length in Vertical slit. The files are written to a temporary folder rather than your
photo library, so dismiss the share sheet without saving and they are gone.
The reason to keep them is quality. The .mp4 can only ever be as good as the working copy, limited to the resolution you loaded at and to the number of frames the device could hold. The map is not a picture of the result, it is the instruction — brightness per pixel, 65,536 levels of it, which is why it is 16-bit and not 8-bit (at 8-bit the time axis visibly steps). A map also carries no resolution of its own: it is read as brightness from 0 to 1 and stretched over whatever frame it is applied to. So take that PNG and your original, full-resolution footage to a desktop, render there with the desktop version (imgtrans), which reads these files as they are named, and you get the same time design at the full quality of the original. Sketch on the device, finish on the desktop.
Sustained exporting warms the device and drains the battery. For a long piece, plug in first.
Settings
Settings is the fourth button on the bottom bar. It opens as a sheet over the main screen; Done at the top right closes it. There is nothing to save — every control takes effect the moment you change it, with two deliberate exceptions: Video Loading and the map dimensions, each of which has its own button.
Video Loading
This section decides how much of the video is held in memory and at what size, and it is the section to reach for when frames are being skipped, the app runs out of memory, or it feels slow. The same section opens on its own when you tap the information line in the full-screen Input view. Until a video is loaded its controls are shown greyed out.
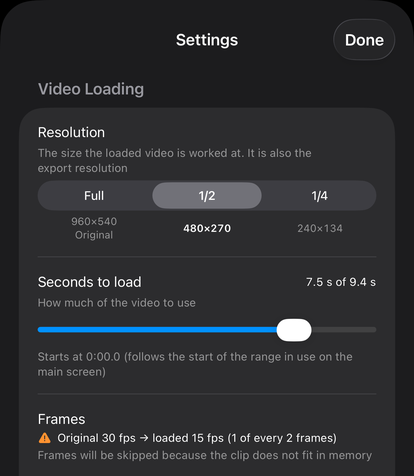
| Resolution | Full / 1/2 / 1/4 — the size the loaded video is worked at, as a fraction of the source; the pixel size of each option is printed under it. The file in your photo library is never modified. This is also the resolution the export is written at. |
|---|---|
| Seconds to load | How much of the video to use, from 0.5 s up to the whole clip in steps of 0.1 s, shown as “… s of … s”. The line underneath gives the start time: when you change the seconds, the loaded part starts at the beginning of the range in use on the main screen. |
| Frames | A read-out. No frames skipped with the source frame rate, or an orange warning giving the source and loaded frame rates and how many frames make one (“1 of every … frames”), with the reason: either the GPU can hold at most 2,048 frames at once, or the clip does not fit in memory. Below 8 fps it adds Motion will look quite choppy. |
| Memory | A read-out: how much the combination uses against what this device can spare right now, and the width × height × number of frames behind it. Frames are stored uncompressed at 4 bytes per pixel. |
| Reload | Reload with these settings — re-imports the clip you already have with the resolution and seconds chosen here, and closes the sheet so you can watch the progress on the main screen. Changes not applied yet appears above it when the choice differs from what is loaded; otherwise it is greyed out, as it is while a video is loading or exporting. |
There is no frame-rate setting: a lower frame rate would not make loading any faster, so the app only skips frames when it has to. When you load a new video, both values are chosen again from that video and the free memory on the device. The app starts from the largest of the three resolutions whose long edge is 1280 px or less, loads the whole clip if it fits, and otherwise cuts back in order: first fewer seconds (aiming for at least 4 seconds, or the whole clip if it is shorter), then skipped frames (keeping at least 15 fps), then the next lower resolution.
The two choices buy different things. Resolution buys detail within a frame, and costs memory in proportion to area — Full is four times the memory of 1/2, not twice. Seconds to load trades length against time resolution: the fewer seconds you load, the less the app needs to skip frames. That matters most in the slit modes: there the renderer samples the nearest stored frame with no blending, exactly as the desktop version does, so a clip thinned to a low frame rate steps visibly. Surface mode blends between the two nearest frames instead, and tolerates thinning much better. If your output stutters rather than flows, load fewer seconds or a lower resolution until Frames reports no skipping.
Reloading keeps your work. The maps are untouched, because the app only rebuilds maps when you load a different video. The audio track is extracted again. Range handles you have moved stay where you put them; if you never touched them, they are re-fitted to the material now in memory. If a reload is cancelled or fails after the old copy has been released, the app reloads the previous settings and tells you so.
Export
| Frame rate | 24 / 30 / 60 fps. The frame rate written into the exported file. |
|---|---|
| Export length | A read-out of the current output length in seconds, the same number shown next to Duration in the editor. |
Frame rate does not change how long the output runs; it changes how many frames are written to cover that time (length × fps). Nor does it create detail that is not there: at 60 fps the renderer still has only the frames you loaded to draw from, so in slit modes a high export rate on a thinned clip just repeats stored frames. Get Frames under Video Loading to report no skipping first, then raise the export rate. Length itself is explained under How long the export will be.
Map resolution (time detail)
The size of the map is not a cosmetic choice. In the slit modes the map’s time axis is the timeline of the output, one row (or column) per rendered moment, so its size decides how finely time is subdivided — and, for a rate map, how long the result runs. For a time map it sets the length the range in use fits itself to until you move a handle.
| Map shape | Square / Portrait / Landscape. A shortcut that sets width and height to 512×512, 512×1024, or 1024×512. The selected segment is inferred from the current numbers rather than remembered. |
|---|---|
| Width | 128–2048 px, in steps of 128. The time axis in Horizontal slit. |
| Height | 128–2048 px, in steps of 128. The time axis in Vertical slit. |
| Estimate | Estimated output length — what the output would run to at these dimensions. It is an estimate because it uses the numbers in the steppers, while Export length above reports the map actually loaded; the two agree once you rebuild. |
| Rebuild | Rebuild the map at this resolution — regenerates the maps at the width and height set here. Maps you have already edited are left alone. |
| Match video | Match the source video’s aspect ratio (default) — returns the map to following the clip: short side 512, long side scaled to the video’s aspect ratio and rounded to 8 px, then rebuilt. Greyed out when no video is loaded. |
By default a map is built to match the source video’s aspect ratio with its short side at 512 px, so a 16:9 clip gets a 912×512 map. Setting a size by hand switches the map to 1:1 pixel display, and anything extending past the frame can be reached by scrolling in the editor.
For a rate map in the slit modes the length works out at one pixel of the time axis per 1/30 second, before the Duration multiplier in the editor is applied (slider centre is 1×, the ends ×0.25 and ×4):
| Time axis | Base length | With Duration |
|---|---|---|
| 128 px | 4.3 s | 1.1–17 s |
| 512 px | 17.1 s | 4.3–68 s |
| 1024 px | 34.1 s | 8.5–137 s |
| 2048 px | 68.3 s | 17–273 s |
A tall map therefore gives a long, slow output; a wide, short one gives a brief, densely scanned output. That also explains the 912×512 default: about 17 seconds under a vertical slit, but about 30 under a horizontal one, because the time axis is the other side. A time map in any mode runs as long as the range in use, and a rate map in Surface runs as long as its fastest pixel takes to cross the range — in every case times the Duration multiplier.
Rebuilding leaves edited maps alone, which is usually what you want — it would be unpleasant to lose a drawing to a settings change — but it does mean the button can look like it did nothing. A map you have drawn on, generated, or repainted keeps its old dimensions, and presets and gradients applied later inherit those dimensions rather than the new ones. To move an edited map to a new size, reset it with the counter-clockwise arrow in the editor’s tool row: that reset rebuilds the map at the size set here, at the cost of the drawing.
One behaviour to know before you spend time on a map: loading a different video rebuilds every map, edited ones included, at a size matched to the new clip’s aspect ratio, and discards a size you set by hand. A map made for one aspect ratio does not mean anything over another. Reloading the same clip — the reload buttons, or rotating the video — does not do this. If a map is worth keeping, export it as a PNG first.
Export options
| Include audio | On by default. Writes the time-manipulated audio into the exported file. Turn it off for a silent .mp4. It has no effect when the source has no audio track, or when the sound is muted or set to Off in the editor’s sound panel — those settings carry through to the export as they are. |
|---|---|
| Map PNG | Also save the map as a 16-bit PNG — off by default. Writes the map alongside the video and opens a share sheet for it: see Exporting for what the files are and why they are worth keeping. |
Current source
The last section is a read-out of what is actually in memory right now, and it is the fastest way to confirm that the settings above did what you expected.
| Loaded video | The file name. Reads No video loaded when there is none. |
|---|---|
| Size | The working copy’s pixel dimensions, after the resolution choice and any rotation — not the dimensions of the original file. |
| Frames | How many frames are actually held. |
| Length | The duration of the whole clip. |
| Loaded range | The span of the clip, in seconds, that those frames cover. |
The full-screen Input view states the effective frame rate directly, next to the source’s. If that number is well under the frame rate you shot at, the output will step rather than flow in the slit modes, and the fix is fewer seconds loaded, a lower resolution, or a shorter range reloaded.
There is nothing else in Settings, and that is deliberate: no account, no sign-in, no sync, no analytics. Nothing is sent anywhere, so there is nothing to configure.
Getting good results
None of this is required to use the app, but it is what separates a result you keep from one you delete. Most of it comes down to giving the map something to work with.
Shoot movement, and lock the camera off
Waves, traffic, people walking, cloth in wind, foliage — continuous motion is the raw material the map redistributes, and a still subject stays still no matter what you draw. If the camera itself moves, the whole frame is already changing and the time distortion disappears into that drift. A tripod, a windowsill, or a phone propped against a cup is enough. Avoid a cut inside the trimmed range, too: brightness picks a moment in the clip, so a cut in the middle of that range turns into a hard tear across the frame.
Slow motion, with one caveat
Stretching time is a question of how many real frames there are to land on, and high-frame-rate footage has far more of them per second of action, so a map that spreads one second across the whole output has something to draw from and the movement stays continuous. No setting can invent frames that were never shot — ten seconds at 30 fps contains 300 and no more.
The caveat is that slow motion reaches the limits first. Ten seconds at 240 fps is 2,400 frames, more than the 2,048 the GPU can hold at once, so the app loads fewer seconds or skips frames — and a skipped frame is a frame you shot for nothing. To actually get the benefit, keep the loaded span short: lower Seconds to load or Resolution until Frames reports no skipping, or trim the range and tap Reload only the range in use.
Work small, then raise the quality once, before you export
In Settings → Video Loading, a Resolution of 1/4 or 1/2 with a few seconds reloads quickly and keeps drawing responsive — that is the setting to design in. When the map is right, raise Resolution, tap Reload with these settings, and export after that: the file is written at the resolution that is loaded, so raising it afterwards does nothing. Reloading the same clip keeps the map you drew; only loading a different video rebuilds it.
Isolate one moment with the range in use
The bar under the input has white handles at both ends and reports the range in seconds; while you drag a handle the input picture shows that edge’s frame. Touching the band scrubs; a long press then a drag slides the window through the clip without changing its length, which is how you hunt for the right three seconds. If the window leaves the loaded part, Reload here brings the loaded part to it. With a Time map in either slit mode those values reappear as Time from and Time to in the Parameters panel, above Reload only the range in use, which re-imports only that span, so fewer frames have to be skipped. Three seconds of one wave breaking beats thirty seconds of the whole clip.
Smooth maps and hard edges look completely different in motion
Maps are 16-bit grayscale, so a gentle gradient becomes a gentle, banding-free drift in time, and a little Blur on a hand-drawn map is usually an improvement. A hard edge is a tear, and its direction decides what kind: in Vertical slit, where the map’s vertical axis is output time, a horizontal edge makes the whole frame jump to another moment as the playhead crosses it, while a vertical edge leaves a standing seam, one band permanently showing an earlier moment than the band beside it. Horizontal slit swaps the two. Gamma, Blur and invert stay reversible until you tap Apply adjustments (overwrites the map), so you can audition a softer version and back out. Cut & slide is the exception worth trying on purpose: it moves a region without tearing, because the gap is filled by blending the two sides of the cut.
Surface for texture, slits for subjects that travel
Surface shifts every pixel on its own and blends between neighbouring frames, so it stays soft and reads like a relief pressed into the image — right for water, fire, foliage, crowds, anything where the whole frame is busy. The slit modes give a whole column or row one single moment and sample the nearest frame with no blending, exactly as the export does, so they stay sharp and suit a subject crossing the frame: a figure walking through a Vertical slit map comes out stretched or repeated rather than blurred. On Surface a Time map is relative — mid grey unchanged, black half of Shift (s) earlier, white half later — and the shift wraps around the ends of the range, so start at a second or two, not the maximum.
Generate first, draw second — not the other way around
Presets, Gradient and From motion fill the map in one tap and give you something concrete to react to, and you can draw freely on top of anything they produce. Choosing Gradient or From motion after drawing, though, rebuilds the map from scratch and your strokes are gone, with no undo. From motion makes a good under-layer: busier areas come out brighter, so the distortion follows what is actually moving, and in Surface its History option lets the trails decay over a Trail (s) period, so the map itself changes as the clip plays.
Learn which way your gradients run
Each preset button is captioned with what it will do given your current settings — Normal playback, Reverse, Frozen at start, Left is earlier — because the same gradient means different things in different modes. In Vertical slit the map’s vertical axis is time, so Top → bottom is ordinary playback and Bottom → top is reverse, while Left → right runs across the time axis and freezes each column at a different moment. Gradients along the time axis control how the clip runs; gradients across it spread different moments over the picture.
Add a Space map when you want the sampling point to move as well
A Space map answers a different question — not when to sample but where — and it is always applied as slits, even when the time side is Surface. In Vertical slit, Left → right is the neutral setting, each output column showing the matching input column. Repaint it All grey and every column shows the same input column, smearing one strip of the source across the frame; repaint it Top → bottom and that strip sweeps across the frame as the clip plays, which is classic slit scan. Put either under a Time map that is also moving and the moment sampled and the place sampled travel independently. Cut & slide on a space map opens the picture up along the cut. When you are done with it, Reset to default in the method list switches it off.
Use the red line to tie the map to what you are seeing
On the main screen the map carries a red playhead: horizontal and sliding down in Vertical slit, vertical and sliding across in Horizontal slit. It marks the row or column being read at that instant, and the same red mark sits on the bar under the output, so when something odd flashes past you can see which part of the map caused it. Drag anywhere on the map to scrub straight there; playback pauses while your finger is down and resumes when you lift it. Surface shows no line, because there the whole map is in use at every instant.
Draw on the device, watch on a display
With a display connected over HDMI or AirPlay the output alone fills that screen while your device keeps the editor, and this is by far the most comfortable way to work on anything serious. Set the layout menu at the top right of the editor to Map only and the device becomes a pure drawing surface with the picture on the wall; switch to Overlay, which lays the map over the image at partial opacity, when a stroke needs to land on a particular object rather than a particular part of the frame. On iPad, turn Stage Manager off first or the display is treated as an extended desktop and the full-screen output never appears. Without a display, the full-screen Output view on the device itself is the quickest way to judge a result at size.
Keep the map, not just the video
Turn on Also save the map as a 16-bit PNG in Settings → Export options and a share sheet offers it alongside the render. The map is the part of the work that can be taken further — rendered at full resolution later in the desktop version (imgtrans), free of the working resolution the phone used — or kept as a record of what you made. Expect the device to warm up: stay plugged in for a long session.
Frequently asked questions
Loading a video takes a long time
The caption under the progress bar names the stage: Fetching from your photo library…, then Expanding frames… with a percentage, then Loading the audio track…. The first stage is iOS handing the file over, and for a long 4K or HDR clip it can take tens of seconds before the percentage even starts to move. Cancel stops the import at any stage. The second stage is shorter when less is loaded: a lower Resolution or fewer Seconds to load under Settings → Video Loading.
The app quits while loading
It is the resolution and the number of frames loaded, not the file size, that decide whether a clip fits. The app sizes each load to the memory it measures as free, but other apps can take that memory back. Lower Resolution or Seconds to load in Settings → Video Loading and watch the Memory line, and close other apps first, which buys real headroom.
A message says frames were skipped
When a clip has more frames than the GPU can hold at once (2,048) or than fit in memory, frames are skipped evenly and an orange note gives the source and loaded frame rates. Slow-motion footage is the usual case. Under Settings → Video Loading, lower Resolution to 1/2 or 1/4 or load fewer seconds until Frames reads No frames skipped; with a time map in a slit mode, Reload only the range in use in the Parameters panel does the same for just the range you are using.
“Frozen outside the loaded part” appears under the bar
The range in use reaches beyond the part of the clip that is in memory, and moments out there hold the frame at the edge. Tap Reload here beside the message: the clip is reloaded at the same resolution and length, positioned so your range sits in the middle of it.
The export stops with an error part way through
Rendering allocates on top of the frames already resident, so an export can run out of memory even though the clip loaded fine — usually reported as a texture that could not be allocated. Lower Resolution or Seconds to load, tap Reload with these settings, shorten Duration, close other apps, and export again.
Nothing seems to happen when I switch between Vertical slit and Horizontal slit
The two modes read opposite axes of the map as time, so a map whose tone varies only from top to bottom drives playback in a vertical slit but returns the same values at every instant in a horizontal one — each row sits on one fixed moment and the picture never advances. Since 1.2 any map you have not edited is rebuilt as the new mode’s normal-playback default when you switch, so this only bites on maps you drew yourself. Open Presets and take the button labelled Normal playback as a fresh base.
I trimmed the clip but the output still uses the whole video
That was a bug in 1.1, fixed in 1.2: in the older build only the time-based slit modes honoured the white handles, while Rate map and Surface kept sweeping the entire clip. Update from the App Store; on 1.1 the only workaround is to trim the video before importing it.
The colours look flat or washed out compared with the original
Every decoded frame is converted to sRGB at import, so an HDR clip — HLG or Dolby Vision, which is what a recent iPhone shoots by default — loses its grade on the way in and will not match what Photos shows you. Convert or grade the clip to SDR before importing it, or export the 16-bit map PNG and render the original HDR footage against it on a computer.
I cannot find the video I exported
A finished export is an H.264 .mp4 saved straight to your photo library, and the app confirms it. If you declined the photo permission it opens a share sheet with the file instead — dismiss that sheet and the render is gone. Grant the permission in iOS Settings → Time Flow → Photos (the app appears as “Time Flow” on the home screen and in iOS Settings) and export once more.
Where is the sound coming from?
The speaker over Output is already on when a clip with sound loads, playing the clip’s own audio put through the same time manipulation as the picture. The speaker over Input is off until you turn it on, and turning it on switches the output one off — only one plays at a time. See Sound for the methods, reverb and voices.
Can I use an external display?
Yes, and it is the intended way to work at any real size. Over HDMI or AirPlay the output alone fills that screen, letterboxed on black with no interface over it, while your device keeps the editor; a Showing on external display badge appears beside the output. On iPad, turn off Settings → Multitasking & Gestures → Stage Manager first, or the display is treated as an extended desktop and the second screen is never created.
Does it work on iPad, and does Apple Pencil add anything?
Both are supported, and the iPad is the better instrument: the map and the two videos all fit at a workable size at once. Apple Pencil adds real pressure — a finger always counts as an average press, so a Pencil goes both thinner (about a sixth) and thicker (about one and a half times) than a finger stroke — and a double-tap on its side opens and closes the brush palette. The Bleed brush covers the other case: hold still with a fingertip and tone keeps building and spreading outward.
Is there an undo?
Not in Draw. A stroke can only be painted back out at low Strength, or the whole map reset with the counter-clockwise arrow at the end of the tool row. Apply adjustments (overwrites the map) is one-way as well, so audition Gamma, Blur and invert before you commit them. Cut & slide is the exception: Revert returns the map to how it was when you opened that method.
My drawing disappeared when I loaded another video
Loading a different clip rebuilds every map at the new video’s aspect ratio, edited ones included, because a map shaped for the old frame no longer lines up. Re-importing the same clip does not — changing the Video Loading settings, reloading the range, or rotating leaves your maps alone.
Can I bring a map in from elsewhere, or take one out?
Out, yes: Also save the map as a 16-bit PNG under Settings → Export options, described in Exporting. In, no — the current version has no way to load an image as a map; maps are made inside the app with Draw, Gradient, Presets, From motion or Cut & slide.
The device gets hot, or the preview starts to stutter
Preview, drawing and exporting all keep the GPU working. Lower Resolution or Seconds to load if the preview stops keeping up, drop the voice count if the audio is the part that breaks up, and stay plugged in for installation or performance use. Build the map at a light working resolution and raise it only for the final render.
Disclaimer and rights
Time Flow Sketch is experimental software intended for making moving-image work. The developer accepts no liability for any damage arising from its use, including data loss, device malfunction, or loss relating to work produced with it.
Rights in the video, images, and audio you load remain yours. If you use material owned by someone else, obtaining the necessary permission is your responsibility.
All data is processed on your device. No personal information is collected or transmitted.
Support
For bug reports, questions, and feature requests, please get in touch. Messages in English are welcome.
ryu.furusawa@gmail.com
https://ryufurusawa.com/contact